20170630

Free Deleted File Recovery Software Recover Deleted Files Quickly

Have you ever deleted your important files accidentally? Are you in need of a perfect solution? Well, here download for free the deleted file recovery software to recover deleted files with speed and safety.
In order to free more storage space, we sometimes may need to delete things that we no longer need. It is very likely that during the process, we can delete useful and important files accidentally. When this happens, we should stay calm and try to look for that file or folder inside the Recycle Bin. The chances are high that you may find your deleted files there. You need only to right click the file and select Restore. However, there are several scenarios that your files are considered permanently deleted.
1. Using Shift + Delete to delete files. By pressing Shift + Delete, the files will be deleted without going to recycle bin first. With default Windows tools, this action is effectively permanent removal of files. The storage space these files took will be marked as “available, free to fill in”. It is suggested that you use Shift + Delete with caution and certainty. Otherwise, use Ctrl + D or right-click-delete in case you delete something useful by mistake.
2. Deleting a file that is too big for Recycle Bin. It turns out that recycle bin is not a bottomless pit after all. Normally when the Recycle Bin is full, the oldest files in the recycle bin will be removed to make space for the newly deleted files. But when a file is too large to fit in the recycle bin in the first place, you will receive a warning “file too big for recycling bin do you want to permanently delete”. If you hit yes, the file will be deleted right away without making a tour to the recycle bin.
3. Emptying the Recycle Bin. Recycle Bin is supposed to give us a chance to undelete files when you make a mistake. It acts like a safe net to inadvertent operations. When we emptied the Recycle Bin, those deleted files will be considered as “no longer needed” and will be permanently deleted by the file system. Once the headers, or file references, are removed, the operating system will no longer be able to locate these files. The spaces the files are taking will be marked as “not in use”. Even if you didn’t actively empty the Recycle Bin, your PC cleaning software might have done it for you.
4. Format. To be more precise, quick format. If you are considering donating your personal laptop or recycling your hard drives, you may choose to format it first to prevent privacy leak. However, quick format doesn’t erase files. That is the price you pay for being quick. When we quick format a memory card or hard disk, the file system only clears the address table to all files. The operating system will not locate any files without their index so when you look at the hard drive you would not see any data and assume the drive is erased. We can also recover files from formatted hard drives with data recovery software easily.
By permanently deleting your files, you will not be able to find them and restore them from the recycle bin, as they are deleted permanently. In such cases, you will need the help from professional data recovery software to save your data. H Data Recovery has 6 unique data recovery modules, each is designed to handle a different data loss situation. You can use the advanced algorithm to scan and recover almost every kind of file from permanent deletion with only several simple mouse clicks. Here, let’s take deleted file recovery as an example to show all of you how to recover deleted files by using free deleted file recovery software.
Step 1. Free download hard disk recovery software and install it on another drive or partition. Launch H Data Recovery Software and select “Deleted Your files Accidentally” by clicking it.
Step 2. Select the partition where your files used to be before they get deleted. If you wish to recover files on Desktop or from Recycle Bin, choose partition (C:). Click Next to start the scan process. It only takes few seconds!
Step 3. When scanning is done, you will be able to see all the files that can be recovered. Check the files you wish to recover and click next to start the recovering process. If the scanning process failed to find your lost file, try our new feature “Universal Recovery”. It is a special module that scans deeper and quicker into the storage and locates all deleted files.
Step 4. Choose a path to store the recovered file. Remember: immediate action leads to greater chance of a successful recovery! Meanwhile, do not put new files into that partition in order to avoid deleted files being overwritten.

NTFS Data Recovery Software

The NTFS file system is the standard file system used in Windows NT families. It has its advantages than the FAT file system, such as security and partition management. As NTFS gains its popularity, data loss issues also rise, such as virus attack and accidental deletions. How to solve NTFS data loss problem? You need to perform NTFS data recovery to undo data loss damages. To complete NTFS data recovery, you need the help of professional NTFS data recovery software H Data Recovery Software.
NTFS Data Recovery software to recover data from NTFS partitions. H Data Recovery software helps users to recover or restore files or folders from Windows NTFS partitions, which are permanently deleted. It easily recovers lost NTFS files system data without any data size limitations. Now users don’t need to go through a long process, the software will quickly recover files from NTFS drives with ease. Even if you permanently deleted data from your hard drive or if user formatted their hard drive, this software easily retrieves NTFS partition data with its high techniques and advanced features.
H Data NTFS Recovery Software has rich features to get back or recover NTFS Data with accurate details without any alterations to the original data, which means there is no difference between recovered data and original data. This method of NTFS recovery is helpful to recover all type of data like – JPEG, Audio, Video, Document and many other formats. This NTFS data recovery software not only can complete free NTFS data recovery under partition logical damage caused by virus attacks but also can complete free NTFS data recovery for data files lost for partition formatting and partition loss.
The software supports all the latest Windows editions. You can install and run H Data Recovery Software on all Windows editions like Windows 10, 8.1, 8, 7 and so on. You can try this software without any payment to evaluate the recovery results. Free download NTFS data recovery software and get your copy of trial edition. It works same as of Licensed version except you will not be able to save recovered data to your local drive with trial edition. Here are some detailed steps for you to follow when trying to recover data from NTFS partitions.
Step 1. Download and install H Data Recovery Software to your computer.
Step 2.  Launch the software. On the main menu, you can see different modules designed to handle different data-loss situations. If you formatted your hard drive without properly backing up its contents, choose the Format Recovery Module to retrieve lost data. If a partition is lost or crashed during the conversion, choose the Hard Drive Partition Recovery module to scan for files inaccessible to you due to the absence of a correct file system.
H Data Recovery software
Step 3. When scanning is done, you will be able to see all the files that can be recovered. Check the files you wish to recover and click next to select a destination you wish to store your recovered files. Remember to save these files to another drive or partition to avoid overwriting.

Digital Media Recovery Software – Memory Card, Photo and Video Recovery

Digital media are usually electronic media that are stored in binary forms, which means states of “0” and “1” for representing data. Digital media can be created, viewed, distributed, modified and preserved on digital electronics devices. For example, hard drives store information in binary form and so are considered a type of physical digital media. Digital media has caused disruption in publishing, journalism, entertainment, education, commerce, and politics. Digital media has also posed new challenges to data security. How do we face the challenge of digital media data loss?
A digital media recovery software performs recovery and restoration of digital files from various digital storage media. There are many potential data loss scenarios for digital media data, such as a virus attack, accidental deletion, OS corruption, improper shutdown, accidental formatting, partition failure, sudden power failure, bad sectors, and more. The H Data Recovery software for digital media recovery is exceptionally the best application program that can achieve the complete recovery without demanding any computer science knowledge. It is an easy-to-use program, which can restore all kinds of digital medium files from data loss. The application features rich data recovery modes that can cover almost all data recovery scenarios.That is to say, the software can retrieve all the lost, deleted, formatted, inaccessible files from various digital storage media such as SD cards, hard disk drives, solid state drives, smartphone microSD cards, USB flash drive and so on.
H Data Digital Media Recovery Software is advanced, easy-to-use software which can be used by any technical or non-technical user. To operate this tool, one doesn’t need any sort of technical expertise. All steps to operate the tool are much easy to understand. It supports recovery of images of different formats such as JPG, JPEG, BMP, TIFF, PNG, GIF, GIFF, PCX, MPEG and MPG, as well as video formats such as MKV, MP4, AVI, RMVB, MOV, etc. It performs a thorough scanning of digital media and extracts every bit of lost, damaged, corrupt, or inaccessible data.
Step 1. Launch H data recovery software. Select a data recovery mode that can best suit your data loss situation. Put your mouse cursor over the buttons to view detailed description of each mode.
Step 2. Select a disk or partition to scan the specific location using H Data digital media recovery software. You can interrupt the scanning process any time you want. The process may take a while, depending on the size of the data to be recovered.
Step 3. After scan, preview all the listed recoverable digital media files and choose those you want to recover to your local disk or external hard drives.Here, it is recommended that you save all the recovered files on a different drive or device in case of data recovery failure.

20170629

How to Recover MS Powerpoint Files

When you realize that the Powerpoint file you are working on is missing, your first reaction may be panic. It could because your computer unexpectedly crashed or you accidentally deleted the file. Sometimes you forget to save the Powerpoint file that you have been working on for hours. Whatever the reason, you’ve suddenly lost hours of hard work and you don’t know what to do next. Don’t worry, there could be ways to save your Powerpoint files. Let find them out!
If you lost PowerPoint files because you forgot to save, you can easily retrieve and recover all your hard work, if you are using the latest versions of Powerpoint. If you were interrupted before you got the chance to save your PowerPoint file (computer crash, power outage or program crash), you can simply look for your file in the Microsoft Unsaved Files folder. Go to the File tab, go to Recent and click on Recover Unsaved Presentations.
If you’ve been making savings of your work, you can retrieve your PowerPoint file using the AutoRecover function. Go to the File tab, click on Options and go to Save to check if you have this feature enabled. If you don’t have AutoRecover enabled, you will have to start over from the last save.
Even if you don’t have auto recovery feature enabled, you can sometimes recover data from the various temporary files that are created by Office while you are working on the document. When a new file is started a temporary file is created. This file could be in the windows temp directory, in “C:\ Documents and Settings\<username>\Application Data\Microsoft”. You may need to search a little bit because Microsoft has changed the temp file location in different versions of Office.
However, AutoRecover is not enough when the automatically saved ppt files are lost due to mistaken deletion, virus attack or other reasons. And what if the original files are missing as well? Our recommendation is to use the professional H Data Recovery Software to recover the lost PowerPoint files.
Step 1. Free download the PPT recovery software. You can choose to free trial the software to test the recovery capability for no charge.
Step 2. Install and Launch H Data Recovery Software and you will see the 6 modules designed for different data loss situations.

Step 3. Choose an appropriate module according to your data loss cause, whether it is accidental deletion/virus deletion, lost partition or emptied Recycle Bin. If you are not sure, try our new feature “Universal Recovery”. It is a special module that scans deeper and quicker into the file structure and locates all deleted files.
Step 4. When scanning is done, you will be able to see all the files that can be recovered. Use the search bar to narrow down the files by entering the extension or file names. Check the files you wish to recover and click Next to select a location to save these files. We suggest that you save these recovered files in another drive or another partition to avoid overwriting.

WAV File Recovery – Recovering Deleted WAV Files

Waveform Audio File Format, or more commonly known as WAV, is a Microsoft and IBM audio file format standard for storing an audio bitstream on PCs. It is an application of the Resource Interchange File Format bitstream format method for storing data in “chunks”. It is the main format used on Windows systems for raw and typically uncompressed audio.
WAV is the best quality of audio file format which allows you to store sound data without quality loss of the audio information. But sometimes, the WAV files stored on PC, external hard drive, USB drive, or SD cards may get deleted or corrupted after accidental deletion, formatting, virus attack, or some other unexpected accidents. Unexpected data loss can happen to everyone at any time.Without any backup, you need to use data recovery software to recover lost WAV files after deleting, formatting or when you run into other data loss problems. H Data Recovery is a data recovery program, which supports the perfect recovery of different types of sound files from various storage media.
There is various data recovery software that advertises to be able to recover WAV files. But the quality of the data recovery result may vary. What is the reliable WAV file recovery software? Here we would recommend H Data Recovery Software to assist you when it comes to WAV sound file recovery. It is a piece of powerful data recovery software that can deep scan the hard drive or other storage devices using the advanced algorithm to locate and recover formatted, delete,  corrupted or inaccessible WAV files to a full extent. It also supports the media file recovery when it comes to file formats like MP3, AVI, WMA, MOV, MPG, MP4, and so on.
How to Recover Deleted or Lost WAV Files
Step 1. Free download WAV file recovery software. Launch H data recovery software and select a data recovery mode. You can put your mouse cursor over the buttons to see the detailed description of each recovery mode.
Step 2. Select the drive where you lost your movie files and click “Next” button to start the scan. The program will begin to look for and recover lost files.
Step 3. When the scan is completed, you will be able to see all the recoverable files listed in the right window. You can select the file type Audio to filter the result. Also, the search bar is very helpful if you can still remember some key words from the original file. H Data Recovery will keep the original file names and directory structure. Now you can select the movie you deleted and choose a safe location to save it to.

How to Recover Data from RAW File System Android Phone Memory Card?

“Hello, I do have bought a new Android phone and take tons of photos with it. However, after it has been borrowed by my cousin for several days, everything stored on the inner SD memory card just cannot be accessed weirdly. When I try to view the stored photos on this camera, it just says the inner memory card needs to be formatted. But, I know the formatting process also will erase everything inside. Moreover, my computer CHKDSK just says the type of the file system is RAW and CHKDSK is not available for RAW drives. This memory card is also shown as RAW file system in Disk Management of my laptop. Do you have any idea bout such SD memory card RAW file system error? Does any RAW file system recovery software really work in recovering my card photos back?”
As long as you haven’t specifically erased your microSD card, we can attempt to recover the lost files using 3rd party utilities such as H Data Recovery Software. H Data file recovery is a fully-featured data recovery software that could recover lost files in most data loss situations, including microSD cards and other portable flash memory devices. To fix a microSD card or to recover files accidentally deleted, you will also need a computer and a card reader.
Step 1. Free download RAW SD Card Recovery Software. Install and launch the software.
Step 2. Insert the memory card into a USB card adapter and plug your card adapter into your computer. Select the Flash Memory Recovery module by clicking it. The software will automatically detect all the flash memory cards currently connected to this computer. Choose your memory card and click Next.
Step 3. H Data Recovery will scan the memory card and try to find and reconstitute the all missing files. When the scan is complete, you will be able to see the list of all recoverable files. If you act quick enough after the format, the chance of a complete recovery is very high.
Step 4. Select all the files you want to restore, and click the Next button. Choose a directory that you want to restore these files to.
Deleted files can be overwritten by new files so it is important that you perform the data recovery with the right tool as soon as you can. Also, when choosing the directory to put your recovered files during the recovery, do not store these files directly on your microSD card to avoid other unrecovered files being overwritten.

20170628

How Do I Recover Files from A USB Flash Drive?

There are lots of the common reasons that may cause your important data lost on the USB flash drive. These reasons may include power surges, accidentally format, elector-static discharge, virus attack, not properly removing the USB flash drive for PCs, accidentally delete files, the drive is displayed as raw, etc. These problems may happen to someone who uses a pen drive, USB drives or flash drives to carry vital data. Any file that’s deleted actually stays on your drive until it’s overwritten with another file. This means that if you act fast, you actually have a pretty good chance of getting the file back. In the case of file deletion.
You can recover files from a USB flash drive as long as the files are not overwritten by new ones. Any file that’s deleted actually stays on your drive until it’s overwritten with another file. This means that if you act fast, you actually have a pretty good chance of getting the file back. In the case of file deletion. If you’ve ever gotten one of the “corrupt hard drive” errors, you know how annoying it can be. However, it’s still possible that data could be recovered. If you attach the hard drive to another computer, you might find that only the operating system has been corrupted and that the rest of your data is fine—in this case, it’s just a matter of copying everything to another hard drive. Similar to deleting a file, formatting a file system destroys information about the previous files and structure of the disk, but the amount of data that’s erased depends on the system format.
Here I recommend you to try H Data Recovery. It is powerful flash drive data recovery software which can help you solve all USB flash drive data loss problems. It can recover lost photos, videos, documents, and emails from most data storage media, including internal/external hard drives, USB drives, SD card, digital cameras, CF cards, etc. A piece of professional data recovery software would be sufficient to recover data from USB flash drives, no matter it is accidental deletion or formatting. It is important to choose a software that is capable of scanning and recovering data from USB flash drives. The data recovering algorithm can deep scan the file structure and recover files free from corruption.
1  Choose the USB Flash Memory Recovery Module shown below to recover data from USB flash drives.
2 Choose from the listed flash drive storage media and hit Next to proceed with the scan. Keep the USB Flash Drive well connected during the scan process. It may take a couple of seconds to minutes, depending on the file size.
3 Preview found USB files. The files that H Data Recovery has found from the USB on your computer will be displayed in a list. Some files may not have their original filenames. You can preview the files to make sure it is not corrupt. You can use the search bar and filters to locate your desired file more quickly.
4 Recover all deleted USB files. To recover your USB files, check the boxes before each file and click the Next button the on the bottom of the main interface. Then every deleted file you selected will be recovered to your designated location. It is highly suggested that such location is on a different drive other than the current one to avoid data overwriting.

Movie Recovery Software – How to Get Back Deleted Movie/Video files

I stacked a lot of movie files on my Toshiba external hard drive. But unfortunately, an accident happened this morning and it made me lose all of my favorite movies. I accidentally formatted this external hard drive. After that, I couldn’t find any file either in the external hard drive. Is there any reliable movie file recovery tools that can help me rescue my files?
Downloading and watching movies on your computer or portable media player has been popular after the introduction of the hard drive and external storage media with large storage capacity. Nowadays people prefer to download movies and save them on their computer or external storage media so that they can watch it anywhere at any time. Although storing movies on your computer or external storage media is convenient, the data loss risks also rise when those movies get deleted or lost. But don’t worry! Recovering movie files is much easier than it used to be. As long as you have the right movie recovery tool and some patience, the chances to recover movie files on your hard drive and external storage device are very high.
Reliable Movie File Recovery with H Data Recovery Software
When you lose movie files due to any reason, don’t panic. The right thing to do is to stop using the device immediately after you losing your data. Don’t copy new data into that hard drive or install new software. That will help you protect the lost movie files from being overwritten by new data. Find a reliable data recovery tool to rescue your data as soon as possible. We recommend H Data Recovery Software. You can restore all media file types deleted or lost from computer and external storage drives. It will guide you through the simple steps to retrieve movie files such as AVI, DIVX, MOV, MPEG, MPG, M4V, WMV, XVID, etc. easily from various storage media like system hard drive, portable hard disk, pen drive, and memory cards used on mobile, camera and Windows computers. Without damaging the data or the storage device, H Data Recovery Software can help you recover lost media files within 3 simple steps.
Step 1. Free download movie file recovery software. Launch H data recovery software and select a data recovery mode. In this case, we’ll choose Accidental Format Recovery mode.
Step 2. Select the drive where you lost your movie files and click “Next” button to start the scan. The program will begin to look for and recover lost files.
Step 3. When the scan is completed, you will be able to see all the recoverable files listed in the right window. You can select the file type Videos to filter the result. Also, the search bar is very helpful if you can still remember some key words from the original file. H Data Recovery will keep the original file names and directory structure. Now you can select the movie you deleted and choose a safe location to save it to.

Software to Retrieve External Hard Drive Data on Windows

The external hard disk drive is one of the most popular storage devices that provides greater portability and expandable storage. The amount of data stored on personal hard drives and corporate servers continues to grow. And so is the risk of data loss. Not everyone is very conscious about this risk and keeps a regular backup of their important files. What if our hard drives failed and we have no backups to fall back on? Can we recover data from failed hard drives? Users may lose crucial data from external hard disk in many circumstances, such as:
  • File system corruption due to improper shutdown when it is connected to computer
  • Accidental formatting portable hard disk drives
  • Partition corruption, deletion or formatting due to user mistakes
  • Hard drive corruption due to sudden disconnection caused by power outage or USB cable failures
  • Severe virus attack to portable hard drive makes it as inaccessible
These situations can either cause damage to hard drives or induce data loss from the storage media. When you encounter unexpected data loss, stop using external hard drive immediately because there might be chances of overwriting data or causing further corruption to drive. Choosing a piece of reliable data recovery software and the data on external hard drives can be restored effectively.
H Data Hard Drive Recovery is one of the most recommended tools to retrieve data from portable hard drives on Windows system. It is designed to accurately scan the lost data in order to restore them from all types of portable hard disk drives such as Seagate, Transcend, WD, Samsung, Toshiba and so on. The helpful interface will help you to get back all types of data like documents, images, audio, video etc. within few mouse clicks. It also supports data recovery from crashed/deleted partitions after severe corruption or accidental operation.
  • Free download hard drive recovery software and install it on your computer.
  • You will see the interface of H Data Recovery with 6 unique recovery modes. Choose a recovery mode that is fit for your data loss situation. Place your mouse cursor on each button, and you will get the detailed description of each recovery mode.
  • Click the button of your recovery options and select your hard drive. It will automatically to scan the partition you choose. After the scan, you will see the window of scanning results, where you can preview the results, and filter the files by size, file type and so on.
  • Choose the files and file folders you need to recover, click Next. Choose a recovery path to restore the recovered results. You should not choose the location where you have lost your files in order to avoid data overwriting.

20170627

How to Restore iPhone Without iTunes Backups

It can be very frustrating if your information in iPhone is getting lost. It might happen unexpectedly in many situations, such as accidentally resetting your device or iPhone getting stolen. How to restore your iPhone information if you have no iTunes backups available? Here are a few tips.
Restore iPhone Using iCloud Backups
You can try to restore your iPhone from iCloud backup if you’ve synced your device with iCloud and have prepared at least one backup file. It is the most efficient alternative to restore iPhone is you don’t have any iTunes backup.
  • Make sure you have a recent backup to restore from. Go to Settings > iCloud > Storage > Manage Storage, then tap a device listed under Backups to see the date and size of its latest backup.
  • Go to Settings > General > Reset, then tap “Erase all content and settings.”
  • From the apps Apps & Data screen, tap Restore from iCloud Backup, then sign in to iCloud.
  • Proceed to “Choose backup,” then choose from a list of available backups in iCloud.
If you are restoring an old iCloud backup on a new iPhone:
  • Turn on your iOS device.
  • From the apps Apps & Data screen, tap Restore from iCloud Backup, then sign in to iCloud.
  • Proceed to “Choose backup,” then choose from a list of available backups in iCloud.
  • You will see a progress bar with time remaining as iCloud restores your data. After the restoring is done, go to Settings > iCloud > Storage to check if the information on your device is fully restored.
Restore iPhone data without iTunes backups 
If you have either iTunes or iCloud backups to restore from, you can try to recover your iPhone information with some iPhone Data Recovery Software. H Data iPhone Data Recovery supports the recovery of various types of iPhone files, including photos from Camera Roll and from other applications, messages, calendars, contacts, notes, and so on. Follow below steps to learn how to recover iPhone data without any backups:
Step 1. Download H Data iPhone Recovery on your computer, install and launch it. You also need to install the latest version of iTunes if you haven’t before.
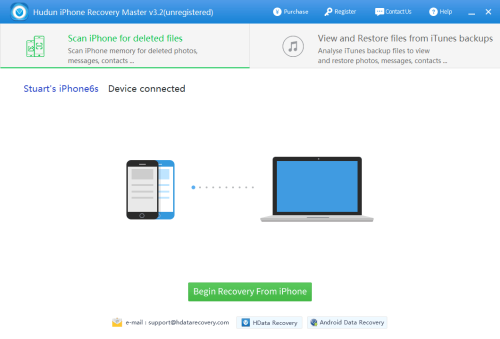
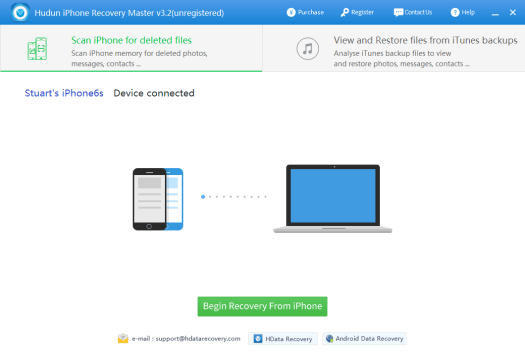
Step 2. Connect your iPhone to a computer with a USB cable, select Scan iPhone for deleted files and click Begin Recovery From iPhone button.
1_connect
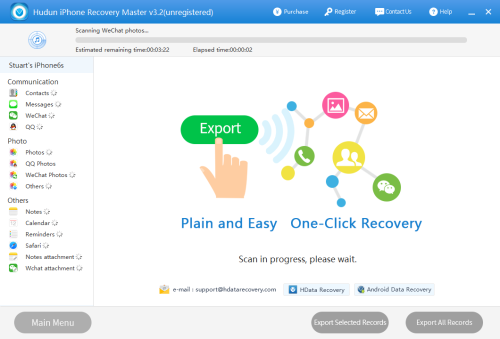
Step 3. Wait for some minutes while H Data iPhone Recovery is gathering all deleted data on your iPhone. Keep your iPhone connected until the process is successfully completed.
scanning iphone
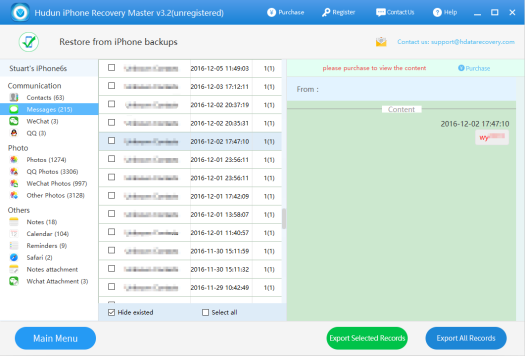
Step 4: When the scanning process is done, you will find your files in categories listed on the right. You can select the files you want to recover and then click Export Selected Records to save them to your computer.
pics

Things to Know About Data Recovery

Date recovery is the process of restoring data otherwise inaccessible from storage media that have suffered data loss situations like accidental deletion, hard drive formatting, partition table corruption and more. Recovery of lost data can be performed on a variety of storage media including hard disk drives, solid-state drives, USB flash drives, computer internal hard drives, SD cards, etc.
What Are the Causes of Data Losses
Data loss situations can be caused by the inaccessibility of storage devices. Logical failure includes file system corruption, operating error, registry damages and so on. This kind of problem prevents users from accessing files stored within the storage devices. However, the data, as well as the internal file structure are undamaged and can be recovered with professional data recovery software. Physical failure, especially damaged storage units (platter in HDD or NAND flash memories in SSD) means potential permanent data loss. This kind of failure requires you to take it to data recovery experts with proper tools and environment (class 100 clean room) if your data is too valuable to lose.
Data loss situations can also mean the files are no longer where they should be. It is revealed that human error is accountable for at least 12% of the causes of data loss. This may include accidental deletion, partitioning, formatting or overwriting without backups etc. Data loss could be a side effect or main purpose of a virus infection. Even anti-virus software might sometimes falsely delete perfectly secure files.
How Does Data Recovery Work?
When we deleted a file, the system just modifies the first two bytes in the file header of this file and marks the sectors containing the file’s data as available. The modifying will be mapped to the FAT of this file, and a deleted tag also will be added to the file so that we can’t see this file anymore. So it means that this file is still stored in our disk. From the file system’s point of view, the file is no longer present on your hard drive and the sectors containing its data are considered free space. However, until Windows actually writes new data over the sectors containing the contents of the file, the file is still recoverable. A file recovery program can scan a hard drive for these deleted files and restore them. If the file has been partially overwritten, the file recovery program can only recover part of the data.
Therefore, the principle of data recovery is searching and analyzing the file header in the disk to find out the files that have been marked, and then try to rewrite the two codes. So, before they are partially or completely overwritten by newer data, files we consider permanently deleted or lost can actually be recovered with professional data recovery software, such as H Data Recovery Software. Viruses targeting and modifying the file headers will cause the deleted files undetectable. You can try with H Data Universal Scan feature or contact data recovery services for professional assistance.
Since we cannot delete files with common means, we can only erase them to make them disappear permanently. This is very important before you consider donating or recycling your old computer or hard drives. Erasing means dumpling 1s or 0s to overwrite latent files. We can shred files or wipe the whole drive with erasing method.
Information stored on the storage drives can be gone at any point in time. You might get no clue about how and why this has happened to you. Data recovery would be your last resort to quickly and easily recover them. Creating a backup and distributing it across different storage media can increase the chances of data availability even if the primary source becomes inaccessible or fails permanently.

How Can I Recover Deleted Files from iPhone?

If you use an iPhone, iPad or iPod, you should sync your files with iTunes regularly to secure your data. Here we will show you how to sync your iOS devices with iTunes.
How to sync iPhone with iTunes
There are two ways for you to sync your iPhone with iTunes: use USB cable and use the Wi-Fi. First, you need to download and run the latest iTunes from the official website. You need to sign in iTunes. Second, use a USB cable to connect your iPhone to the computer. Then the iTunes will ask you that “Do you want to allow the computer to access information on your iPhone?” Click the Continue button. Then, click the Phone icon on the top left-side bar. On the left side, it lists all the content types that you can sync from your iTunes library to your device. On the right side is the detailed information about your device: the capacity, iOS Version, Serial Number, Backups and so on. Click the content you want to sync.
How to backup your iPhone to iTunes?
Click the File tab on the top left side, choose Devices > Back up. It will start to sync your iPhone with iTunes immediately. It will take a long time if you have too many data on your phone.
After you have backed up or sync your data to iPhone, you can easily restore them from iTunes at any time. If you have not sync your data to iCloud or iTunes, you need to use an iPhone data recovery tool to retrieve your data. H Data iPhone Recovery software is a tool designed for all iPhone users to restore the lost data. You can use this software to recover directly from the iPhone or from iTunes backup.
How to restore files from iTunes backups after data loss?
If the files lost have not been backed up to iTunes, you need to back up the entire iPhone to iTunes first, and then to use the data recovery software to analyze iTunes backup files to restore your lost data. Connect your device with computer and check if the data recovery software can detect it. If not, you need to refresh or check the USB cable.
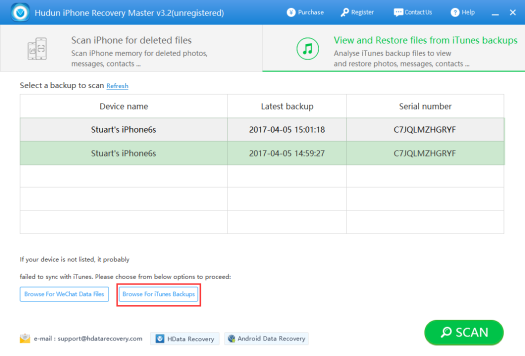
Until it displays in the lists, you can start to recover. Choose the recovery module of View and Restore files from iTunes backups and check the correct device to scan. You can figure according to the latest backup time and the Serial number. After the scan, you can find all the recovered contents on the left side. Check and preview the files. The files lost are displayed in red. You can check the box “hide existed” to display the files that not on your device now. Check the files you need to recover and click the button of Export Selected Records. You are required to choose a location to save the recovered data.

20170626

How to Recover Lost Safari Data from iPhone and iPad

Safari is the web browser for iPhone and iPad by default. It includes your browsing history and bookmarks. Some of them are useful and convenient for you that if you lost them, it could cause some real inconveniences. There are many potential scenarios where you could lose Safari data. Such as accident deletion, upgrading iOS, system crash, factory reset, jailbreak and so on. What should we do in the event of Safari data loss?
First of all, you should restart your iPhone and restart Safari to check if Safari bookmarks are back. If the bookmarks do not go back, you have to use the data recovery software to extract existing browsing history and bookmarks from your iPhone. H Data iPhone recovery software is a professional data recovery software for iOS devices and used on Windows computer. It can restore nearly all data on iPhone, covering Safari history, notes, calendar, contacts, photos, messages and other data on apps. It supports two recovery mode: scan and view from iTunes backup; scan from iPhone. You are also able to preview the data on the software recovery window and selectively restore the files you need.
How to restore iPhone Safari from iPhone?
Without iTunes or iCloud backup, you can only restore from your device. To achieve this, you need a computer or laptop, your iPhone and a USB cable, and the H Data iPhone recovery software. Follow these steps to restore your lost Safari data.
Free download H Data iPhone recovery software on your computer. Install and run it, and select the recovery mode to recover from iPhone. You need to use a USB cable to connect your iPhone to the computer. As it shows that your device is connected, you can start to recover data.
Click the Begin Recovery From iPhone button to let it automatically scan your entire iPhone. As this process may take a little while, depending on the data size, you should make sure your laptop has enough power, and keep the devices well connected during the process, or it may lose connection and interrupt the scanning.After the scan, you are able to preview all the contents recovered from your iPhone. Click Safari, you can preview the safari browsing histories on the right side.
After the scan, you are able to preview all the contents recovered from your iPhone. Click Safari, you can preview the Safari browsing history on the right side. Tick the safari records and export them to your computer. If you have an iCloud backup, the easiest way is to restore from iCloud. Sign in iCloud.com and go to Settings, you will find the option of Restore bookmark in Advance. Choose the bookmarks that you want to restore and click Restore button to restore them. But what you need to note is that your chosen bookmark will replace all the bookmarks on your iPhone.

Where Do Deleted Files Go And How to Undelete Files

When you first delete a file on a computer, it is moved to the computer’s Recycle Bin, Trash, or something similar depending on your operating system. Desktop Recycle Bin is not an actual folder that could store files. It is a virtual folder that collects information about deleted file — their location, deletion date, and file size…then it displays this information to you in a user-friendly way so you can view and perform further actions like permanent delete or restore. When files emptied from recycle bin, they are not actually gone permanently from your computer. Instead, these deleted files will continue to exist in hard drives as raw data. It is the pointers in the address table that have been removed. This means these files are invisible to users and the system will view the space they used to take as free space that can be overwritten. It is way more efficient this way than erasing every file that got deleted by overwriting with new random data.
When a computer deletes a file, it is removing the reference to the file on the hard drive. Once the file header, or reference, is removed, the computer can no longer see the file. The space the file took up is no longer reserved for that file, and any new file can be stored in that location. What does this mean? The file is no longer readable by the computer. However, the file is still on the hard drive, at least until another file is saved to the same location. Because the file is technically there, it may be able to be recovered using data recovery software, designed to rebuild the file header and allow the computer to see the file again. This software only works if no other file or data has been saved over the top of the deleted file.
Data recovery software takes advantage of the mechanism of deletion. When we delete a file, the file system only removes the address pointer to that file. The computer just marks it as “deleted, can be overwritten”. If we put new files in, the computer may notice the newly freed space and cram the new file there. By doing so, the data of the old file, which is a complex combination of ones and zeros, will be re-arranged to form the new file data. That’s why overwritten files can hardly be recovered. As long as your lost files are not overwritten or physically destroyed, professional data recovery software such as H Data Recovery will be sufficient to scan, search and reconstitute these files and restore them.
We can easily perform the recovery from data loss on our own by using professional data recovery software such as H Data Recovery Software. According to your data loss situation, you may choose from one of the 6 modules this software has to offer. These situations include accidental deletion, emptied recycle bin, accidental formatting of drives, damaged or lost partitions, etc.
Step 1. Free download Data Recovery Software. Install and launch H Data Recovery Software, and select one module by clicking it.
Step 2. Select the partition where your files used to be before they get deleted. If you wish to recover files on Desktop, choose partition (C:). Click Next to start the scan process.
Step 3. When scanning is done, you will be able to see all the files that can be recovered. Check the files you wish to recover and click next to start the recovering process. If the scanning process failed to find your lost file, try our new feature “Universal Recovery”. It is a special module that conducts a thorough scan and tries to find and reconstitute every deleted file.
Step 4. Choose a directory or device to store the recovered files. Do not put new files into that partition in order to avoid deleted files being overwritten.

Recover Lost Data with Original File Names and Directory Structure

File deletion helps us to clear unnecessary files and free up more storage space. However, there are a lot of people around the world delete useful files accidentally every day. Unexpected data losses really make people upset. It is especially so when we deleted some large folders with dozens even hundreds of sub-folders and thousands of individual files. There is various of data recovery software out there, you can surely recover some of the files. But it would be most efficient to recover these files with their original names and directory structures. It would save us a lot of energy and head-scratching. Here we would recommend H Data Recovery Software. This software is professional in rescuing data from different complex data loss situations and it is able to retain the original file name and folder structures while restoring the data.
How to Use Data Recovery Software with Original File Names to Restore Data
With H Data Recovery Software, you don’t have to worry about the random illegible file names anymore. H Data recovery software can recover files from formatted hard drives, emptied recycle bins, raw hard drives, accidental deletions and so on. Follow the below steps and start rescuing lost data.
Step 1. Free download H Data Recovery Software. Install and launch it, and select one of the recovery modes to continue. You can see the detailed description of each mode by putting the mouse cursor over the buttons.
Step 2. Select the partition where your files used to be before they get deleted. If you wish to recover files on Desktop or from Recycle Bin, choose partition (C:). Click Next to start the scan process. It only takes few seconds!
Step 3. When scanning is done, you will be able to see all the files that can be recovered. Check the folder you wish to recover and click next to start the recovering process. You can click on the folder and preview the files inside that folder with their original directory structure intact.
If the scanning process failed to find your lost file, try our new feature “Universal Recovery”. It is a special module that scans deeper and quicker into the storage and locates all deleted files. It is not recommended to put the recovered files on that partition or drive where you lost the data, in order to avoid deleted files being overwritten.

20170623

Recover Deleted MMS from iPhone

MMS, or multimedia messaging service, allows iPhone users to send each other multimedia messages. MMS messages can support short videos, images, audio clips, and other data. To send an MMS on the iPhone, tap the camera/microphone icon next to the text-input area in the Messages app, or you can select an existing photo or video by tapping the sharing box.
Have you ever lost any of your favorite multimedia messages? Maybe after an accidental deletion, or an iOS update that goes wrong. Don’t lose hope yet, there are different ways to restore lost MMS from iPhone, depending on whether or not you have properly backed up your iOS devices before.
How to recover MMS messages using backups
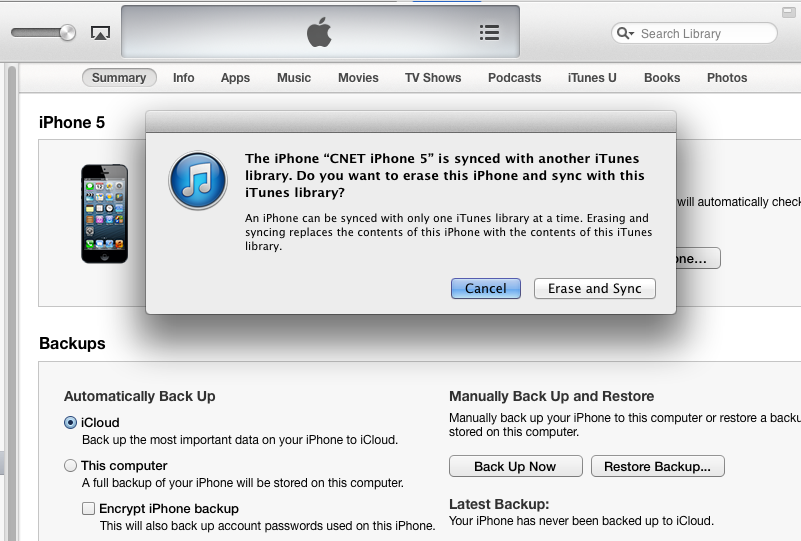
As the default recovery solution provided by Apple, you could restore files from iTunes or iCloud, if you synced your device before. However, the tradeoff is to lose current files on your iOS device during the restoring, for iTunes would restore everything back to the previous state.
  1. Make sure you have a recent backup to restore from. Also read: How to make iTunes Backups
  2. Install the latest version of iTunes if you don’t have it. Launch iTunes and connect your device to your computer. If a message asks to Trust This Computer, follow the onscreen steps and click Trust.
  3. Select your iPhone when it appears in iTunes. On the left panel, select Summary and go to the Backups section. Select Restore Backups… to restore files from your iTunes backups.
Alternatively, to restore your iPhone from iCloud requires a working Wi-Fi network to connect your iPhone to. From the apps Apps & Data screen, tap Restore from iCloud Backup, then sign in to iCloud. Proceed to “Choose backup,” then choose from a list of available backups in iCloud.
How to recover MMS messages without backups
If you just want to restore your SMS/MMS without restoring your iPhone, you need an iPhone recovery tool that can help you to extract iPhone files from backup files selectively. Also, if you haven’t backup your iPhone, you can recover lost MMS messages by direct scanning the iOS device. H Data iPhone Data Recovery software allows you to extract and recover iPhone MMS/SMS within several clicks, and you can preview lost files before recovering them.
Step 1. Free download H Data iPhone Recovery and install it on your computer. Connect iPhone to computer, select View and Restore Files from iTunes Backups. Choose an iTunes backup file and click SCAN.
If you can’t access your iPhone for the moment, you can also click Browse for iTunes Backups to manually select an iTunes backup file. This is why we recommended in the previous part to create the backup file on This computer.
1_browse for itunes
If no iTunes backup is available, connect your iPhone to a computer with a USB cable, select Scan iPhone for deleted files and click Begin Recovery From iPhone button.
1_connect
Step 3. When the scanning process is done, you will be able to see all the recoverable files. Choose Messages on the left panel, you will find all your messages listed on the right. You can browse and select the ones you want to recover and then click Export Selected Records to save them to your computer. You can check the Hide Existed box to only view the deleted messages. For pictures in messages, you can also look into the Other Photos category.
1_mess3