We sometimes share files on our computers to our work colleagues. But it gets annoying when some important files get missing- probably accidentally deleted by others, or removed by computer cleaning software without our knowing. How to prevent files from getting accidentally deleted or removed? Here are some tips you can try.
1. Set files/folders as Read-only
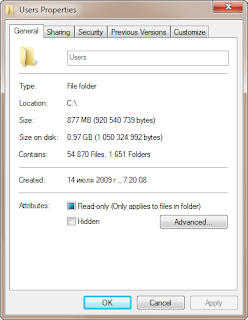
Normally if a file/folder is set as read-only, you will be noticed by system upon your attempt to deleting it, thereby minimize the chance of deleting useful files by human error. Here are the steps to set files/folders to read-only.
Step 1. Locate the file or folder you wish to protect.
Step 2. Right-click and go to Properties. Select the General tag.
Step 3. Check the Read-only box and then Apply.

2. Change File Permissions
You can change file permission to lock down certain files or deny access to unauthorized users. Here is how to change file permissions:
Step 1. Log into Windows as Administrator. You cannot access most of the permission settings if not.
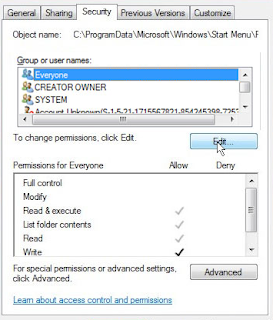
Step 2. Select and right-click on the file or folder you wish to change permissions for. Select Properties.

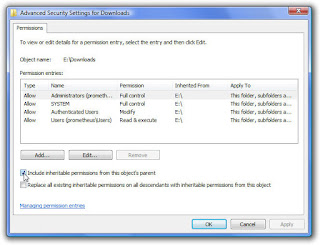
Step 3. Go to Security tag and click on Advanced. Uncheck Include inheritable permissions from this object’s parent. Click Remove on the prompt dialog box.

Step 4. Select Yes in this new dialog box: You have denied all users access to xx. No one will be able to access xx and only the owner will be able to change the permissions. Do you want to Continue? When this step is done, you will be able to see a lock on the folder you just changed permission for and it will not be protected from accidental delete or unauthorized modification.
3. Utilize Encryption Software
Encrypted files cannot be deleted without a correct password. Professional encryption software should be your primary option when handling sensitive and important files, because it provides more advanced encryption algorithm over regular free ones, making files less possible to be deleted by misoperation or deliberate sabotage.
How to Recover Accidentally Deleted Files
In worst case scenario where you lost your data and have no backup to turn to, you could always use some professional recovery software to help you retrieve those data. It is important that you choose reliable software so your data won’t get damaged during the recovering process. H Data Recovery Software is a fully-featured, powerful software compatible with Windows OS.
Step 1. Launch H Data Recovery Software and select the first module (Deleted Your Files Accidentally) by clicking it.

Step 2. Select the partition where your files used to be before they get deleted. If you wish to recover files on Desktop, choose partition (C:). Click Next to start the scan process.

Step 3. When scanning is done, you will be able to see all the files that can be recovered. Check the files you wish to recover and click next to start the recovering process. If the scanning process failed to find your lost file, try our new feature “Universal Recovery”. It is a special module that conducts a thorough scan and tries to find and reconstitute every deleted file.

Step 4. Choose a directory or device to store the recovered files. Do not put new files into that partition in order to avoid deleted files being overwritten.

No comments:
Post a Comment