20170508

2 Ways to Recover Photos from iTunes Backups

The resolution and capability of the iPhone camera keep getting better with every new iteration. Apple also offers services like iCloud and iTunes to ensure the safety of the photos by allowing iPhone users to backup the photos taken. Backing up photos with iTunes is very simple and doesn’t require the internet connection. iTunes backup makes it easy to transfer data to new iOS devices, and to recover lost files in the event of data loss. (Also read: How to make iTunes backups)
While iTunes is a great option to keep the data safe from loss, it can be very difficult to gain access to the backup file when you want to extract the photos. In order to ensure the safety and integrity of the backup files, Apple doesn’t save these files in formats you can read or edit. So, how to recover photos from iTunes backups?
There are two ways to do it: restore the iPhone to the latest iTunes backup which could result in loss of all existing data or to utilize a third-party iPhone recovery tool such as H Data iPhone Data Recovery to directly extract the photos from iTunes backups without data loss.
How to Recover Photos from iTunes Backup by Restoring iPhone
The method gives you the chance to restore all the photos from your iTunes backup file by restoring the phone to the most recent backup. However, the trade-off of this method is that the process will remove the data and pictures newer than the backup.
Step 1: Connect your iPhone to the computer and launch iTunes. Make sure your iTunes is the latest version.
Step 2: Under the Summary tab, choose Restore Backup… button.
1_itunes

Step 3: Choose a preferred and most recent backup file when prompted.
Step 4: Press Restore to begin the restoration process. Wait until the process completes and check for your lost photos.
Extract Photos from iTunes Backup using H Data iPhone Data Recovery Software
You can also use H Data iPhone Data Recovery Software to retrieve photos from an iTunes backup. Even if you have no experience before, you can start using it naturally. The program will help you extract the data from iTunes backups quickly and safely. H Data iPhone Recovery supports the recovery of various types of iPhone files and data, including Camera Roll, Photo Library, WeChat pictures and other photos scattered across different applications.
Step 1. Free download H Data iPhone Recovery and install it on your computer. Connect iPhone to a computer, select View and Restore Files from iTunes Backups. Choose an iTunes backup file and click SCAN.
1_itunes restore
You can also click Browse for iTunes Backups to manually select an iTunes backup file.
1_backups 3
Step 3. When the scanning process is done, browse the content under Photo. The photos from your library, applications and other sources are categorized for your easy preview.  Click on the categories on the left and freely check for details. If you want any of these files to be extracted to your computer, simply select them and click on the Export Selected Records.
1_pics itunes

How to Recover Photos Removed from “Recently Deleted” Album on iPhone

Apple added Recently Deleted folder in iPhone since iOS 8, so that iPhone or iPad users have a chance to restore the accidently deleted iPhone photos from the Recently Deleted folder. Normally, to recover a deleted picture, you only need to go to the Albums page in your Photos app and find the Recently Deleted album at the bottom of the page. Select it and tap on Recover and the picture will go back to your regular Camera Roll album, in the same position where it originally was. But these photos will not stay in there forever. After 30 days, your photos or videos will be permanently deleted to free up the storage space.
If the photos inside the Recently Deleted folder is permanently deleted, is there any way to bring them back?
The best option is to make sure you regularly backup your iPhone in iTunes or to iCloud. In this way, if you accidentally delete something, you’ll still have access to it.
If you have no backups available, you can try to recover your deleted photos by directly scanning your iOS device. This can only be achieved by using professional iPhone data recovery tools such as H Data iPhone Data Recovery Software. H Data iPhone Recovery supports the recovery of various types of iPhone photos, including Camera Roll, Photo Library, WeChat pictures and other photos scattered across different applications. It allows you to preview deleted photos in thumbnails so that you can selectively recover the ones you need, instead of the whole photo database.
How to Recover Photos Permanently Removed from Recently Deleted Album
Step 1. Connect your iPhone to a computer with an USB cable, select Scan iPhone for deleted files and click Begin Recovery From iPhone button.


Step 2. Wait for some minutes while H Data iPhone Recovery is gathering all deleted photos on your iPhone. Keep your iPhone connected before the scan is completed.
Step 3. When the scanning process is done, you will be able to see all the recoverable files in their corresponding catalogs. Choose Photos on the left panel, you will find all your photos, including those deleted, listed on the right. They are shown as thumbnails for your quick browse and preview. You can select the photos you want to recover and then click Export Selected Records to save them to your computer.
pics

Common Causes for iPhone Data Loss - How to Recover iPhone Data

iPhone data loss is one of the modern time tragedy. To lose photos, contacts, notes or messages on your iPhone makes you feel helpless. iPhone data loss could be totally random accidental: an accidental deletion or a failed software upgrade. A lot of things can make your iPhone data inaccessible. Whichever the reason, we can still find some way to recover the lost data.


Common causes for iPhone data loss

1. Human errors. A human error is the most common cause for iPhone data loss. Accidental deletion of iOS data is more than frequent among iPhone users. For example, you could delete a new iTunes backup or restore your iPhone from a wrong iTunes backup file.

2. Software upgrade failure. iOS upgrade failure can also make your iPhone unusable and lead to a case of data loss. A cable disconnection, a power failure or network breakdown during the updating process could lead to data corruption or immediate data loss.

>>How to Restore iPhone from Recovery Mode After iOS Update Failure?

>>How to Fix the iTunes Error 53 and Recovery Data?

3. Physical damage. Physical damage is responsible for a lot of iPhone data loss. Dropping your iPhone to the ground? Sound Familiar? Or you forgot to take your iPhone out of the pocket and it spent the afternoon in the washing machine? The physical damage occurs unexpectedly, so it is best to keep your phone in a solid protective case. Fortunately, damaged iPhone doesn’t mean we lose the data we stored are lost forever. There is software, such as H Data iPhone Data Recovery, that can extract your iPhone files from your iTunes backups easily.

>>How to Recover iPhone Data from iTunes with Ease?

>>What is iTunes Backups?

4.  Lost or stolen iPhone. An iPhone lost or stolen also leads to data loss because you can no longer access your files. Luckily, you still have a few ways to recover data from the phone even if you don’t have access to your device.

>> How to Recovery Data from Lost or Stolen iPhones?

5. Factory Reset. A factory reset procedure will erase all your iPhone’s content. If by accident or not you factory reset your iPhone and don’t have an iTunes backup file or an iCloud backup, your data is possibly lost forever. You may still have a chance by using H Data iPhone Data Recovery immediately after the factory reset to rescue the deleted files before they get overwritten.

>>How to Recover iPhone Data after Factory Reset?

How to Protect Data on your iOS Devices

Prevention is the best solution. Here are some tips you can take to prepare your data for any future risks:

1. Make regular iTunes backup files and make multiple copies of them on your storage devices.

>>How to make iTunes backup files?

>>Where to locate iTunes backup files?

2. Create an iCloud account and associate it with your device. Create regular iCloud backups, especially before making big changes on your phone.Activate “Find My iPhone” to be able to track it if it’s lost.

3. Enable “Find My iPhone” so you can track your iOS devices if they are lost or stolen. You can remotely delete or lock your device to ensure the safety of your personal information.


4. Use the protective case to protect your iPhone from minor physical damages.

H Data iPhone Data Recovery is the professional iOS data recovery software that allows users to preview and extract data from iTunes backup files, or to directly scan the iOS device to retrieve lost data, such as photos, audio messages, reminders, notes, contacts, and various application data.   


20170330

Recover Data from Disk Repartitioning | Partition Recovery Software

When you partition a hard drive, we divide the physical storage medium into several separate logic units. This is often the first thing we do when we acquire a new drive before we can store any files. The information about partition sizes and locations will be stored in the area called partition table so the operating system will know where to find these partitions.


There are times when you have to do something to optimize your partition arrangement. For example, the system partition is running out of space; excessive partitions dragging the system slow; you need to free up more space for your second operating system...In these cases, you sometimes need to extend partitions, shrink partitions, create new partitions, merge partitions, etc. These operations are called repartitioning.

Whether you merge several partitions into one, or remove excessive partitions and distribute the free space to another one, you are deleting existing partitions which means your files will get deleted. You'd better backup your important files beforehand.

Repartitioning a hard drive is not always 100% safe and may lead to data loss if you encounter any interruptions or incorrect operations to the hard drive. Errors like Exception Processing Message’, Not Enough Memory can make your hard drive inaccessible and even cause your partition to crash after repartitioning the hard drive. During the process, some errors may cause MBR corruption or partition table damage, which leads to the computer not be able to boot. You will receive warnings like "Non-System disk or disk error,replace disk and press a key to reboot"; "Error Loading Operating System", or "No ROM Basic,System Halted".

How to Recover Files after Failed Repartitioning

However slim the repartitioning failure chance might be, we should at least know what to do if it does happen. Of course, the backups are the first choice. After all, that is what backups are for. What if the backup is not perfect and we need more files to be recovered. Are files lost due to partition crash gone forever? Not necessarily.

When a file is gone (deleted, cleared during format,etc.), it is not actually vanished. The raw data still linger on the drive. The computer system only marks that data deleted and overwritable. As long as the deleted data is not overwritten by new data, it can be found, reconstituted and recovered. Therefore you are able to recover files after failed repartitioning, with the help of data recovery tools.

We recommend H Data Recovery Software. H Data Recovery includes 6 data recovery modules: Accidental Deletion Recovery, Damaged/Lost Partition Recovery, Flash Memory recovery, Recycle Bin Recovery, Formatted Drives Recovery and Universal Recovery, which is the last resort when all other attempts fail.

Step 1. Free download, install and launch H Data Recovery Software

Step 2. Choose “Hard Disk Partition Lost or Crash” from the main menu


Step 3. Perform a full scan on the drive. Wait while the program is locating and rebuilding data.


Step 4. When the scanning is complete, you can choose from the listed files and save them to your desired safe directory. It is highly recommended that the directory is located in another drive to avoid potential data overwriting.

How to Recover Files from Formatted HDD

I was about to format my external USB but I formatted my whole E: drive (TOSHIBA 1TB 7200RPM 3.5”) which had all my data, important files, years of hard work. How do I recover it?


HDD (Hard Disk Drive) recovery is possible if the data is not physically destructed or wiped out. Normal deletion or disk formatting would only delete the pointers to these files. The data remanence, which is the cluster of magnetic domains representing 1s and 0s on the surface of HDD platter continues to exist even after the files have been deleted. This is the reason why HDD data recovery software is able to recover lost files from hard disk drives. That’s also why data security experts advise against simply formatting a hard disk drive before you dispose of your personal computers or storage devices.

Professional HDD data recovery software such as H Data Recovery Software allows you to locate and reconstitute missing data from your HDD with no pain. It offers the best solution to solve various data loss situations. You can recover files from emptied recycle bin, re-formatted hard drives, corrupted camera SD cards, deleted partitions…

How to Increase the Success Rate of HDD Recovery

Every data recovery specialist would recommend you to avoid writing new data into the storage device in the event of data loss. Overwriting includes using file shredding software to shred files; using drive cleaning software such as DBAN to wipe entire drives; overwriting by putting new data upon old file locations…File shredding software and drive cleaning software is designed with security in mind. The sole purpose is to eliminate the risk of security and privacy breach posed by unauthorized recovery.

It is high recommended that you begin the data recovery as soon as possible to avoid any potential overwriting. Do not attempt to re-partition the hard drive or to reinstall the operating system. Do not put new files to the partition you wish to recover or run programs like fdisk.

How to Recover Data from HDD 

Step 1. Launch H Data Recovery Software. There are 6 different data recovery modules, each designed to handle a different data loss scenario, such as deletion, format or partition crash. If you are not sure about the cause, you can choose the Universal Recovery module.

H Data Recovery software

Step 2. H Data Recovery Software will then start the data scan. When it is done, all the files that have been deleted will be listed. Browse and preview the files and select those files you wish to recover.

Recovered Files

Step 3. Choose a path to store the recovered files. Remember to save the files on another drive or partition to avoid data overwriting. It is important that you act fast when you attempt to recover deleted files in order to avoid newly created files overwriting the lost ones.

H Data Recovery Recover Lost Files Scanning

H Data Recovery Software is also capable of recovering data from Raw NTFS/FAT HDD, formatted digital camera SD cards, smartphone microSD cards, and formatted pen drives and solid state drives.

Recover Accidentally Deleted Files | How to Avoid Accidental Deletion

We sometimes share files on our computers to our work colleagues. But it gets annoying when some important files get missing- probably accidentally deleted by others, or removed by computer cleaning software without our knowing. How to prevent files from getting accidentally deleted or removed? Here are some tips you can try.


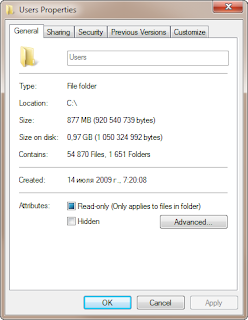
1. Set files/folders as Read-only

Normally if a file/folder is set as read-only, you will be noticed by system upon your attempt to deleting it, thereby minimize the chance of deleting useful files by human error. Here are the steps to set files/folders to read-only.

Step 1. Locate the file or folder you wish to protect.
Step 2. Right-click and go to Properties. Select the General tag.
Step 3. Check the Read-only box and then Apply.


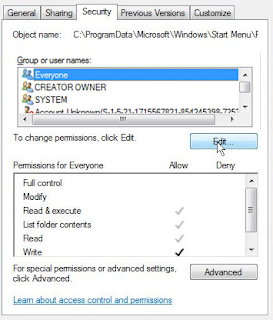
2. Change File Permissions

You can change file permission to lock down certain files or deny access to unauthorized users. Here is how to change file permissions:

Step 1. Log into Windows as Administrator. You cannot access most of the permission settings if not.
Step 2. Select and right-click on the file or folder you wish to change permissions for. Select Properties.


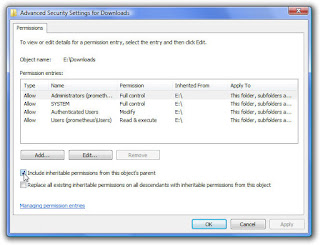
Step 3. Go to Security tag and click on Advanced. Uncheck Include inheritable permissions from this object’s parent. Click Remove on the prompt dialog box.


Step 4. Select Yes in this new dialog box: You have denied all users access to xx. No one will be able to access xx and only the owner will be able to change the permissions. Do you want to Continue? When this step is done, you will be able to see a lock on the folder you just changed permission for and it will not be protected from accidental delete or unauthorized modification.

3. Utilize Encryption Software

Encrypted files cannot be deleted without a correct password. Professional encryption software should be your primary option when handling sensitive and important files, because it provides more advanced encryption algorithm over regular free ones, making files less possible to be deleted by misoperation or deliberate sabotage.

How to Recover Accidentally Deleted Files

In worst case scenario where you lost your data and have no backup to turn to, you could always use some professional recovery software to help you retrieve those data. It is important that you choose reliable software so your data won’t get damaged during the recovering process. H Data Recovery Software is a fully-featured, powerful software compatible with Windows OS.

Step 1. Launch H Data Recovery Software and select the first module (Deleted Your Files Accidentally) by clicking it.

H Data Recovery software

Step 2. Select the partition where your files used to be before they get deleted. If you wish to recover files on Desktop, choose partition (C:). Click Next to start the scan process.

select partition

Step 3. When scanning is done, you will be able to see all the files that can be recovered. Check the files you wish to recover and click next to start the recovering process. If the scanning process failed to find your lost file, try our new feature “Universal Recovery”. It is a special module that conducts a thorough scan and tries to find and reconstitute every deleted file.

Recovered Files

Step 4. Choose a directory or device to store the recovered files. Do not put new files into that partition in order to avoid deleted files being overwritten.

20170321

How to Undo Shift Delete to Get Back Your Lost Files

When you shift+delete something, the files will be deleted without going to recycle bin first. With default Windows tools, this action is effectively permanent removal of files. It is called permanent delete because we are not able to restore file from recycle bin like normal deletions. Does this mean the files are destroyed and cannot be recovered? Not really.
delete
When a file is deleted from your computer with the Shift + Del combination key, its contents aren’t immediately destroyed physically. Windows simply marks the hard drive space as being available for use by deleting the pointer to that deleted file. If you can successfully restore the address table and the pointers, you can get your permanently deleted files back. However, this process isn’t very easy for users with little technological background. Luckily, profession data recovery software provides a much easier approach.  If you accidentally deleted files that you cannot restore from recycle bin, you can use H Data Recovery Software to help you retrieve them.
There is various data recovery software out there in the market, you can pick one that works best for you. Being secure, easy-to-grasp and professional, H Data Recovery Software can surely earn the first place in your choice. If you accidentally deleted files that you cannot restore from recycle bin, you can use H Data Recovery Software to help you retrieve them, no matter the what the file formats are – images, videos, audios, documents, emails and so on. Here is how to undo shift+delete in Windows system with H Data Recovery Software.

Step 1. Launch H Data Recovery Software and select the first module (Deleted Your Files Accidentally) by clicking it.
H Data Recovery software
Step 2. Select the partition where your files used to be before they get deleted. If you wish to recover files on Desktop, choose partition (C:). Click Next to start the scan process.
select partition
Step 3. When scanning is done, you will be able to see all the files that can be recovered. Check the files you wish to recover and click next to start the recovering process. If the scanning process failed to find your lost file, try our new feature “Universal Recovery”. It is a special module that conducts a thorough scan and tries to find and reconstitute every deleted file.
Recovered Files
Step 4. Choose a directory or device to store the recovered files. Do not put new files into that partition in order to avoid deleted files being overwritten.